Thursday, 10 January 2013

DIY Worm Pinata

My daughter just turned 6. We can barely believe it, the years have gone so fast, yet they also seem to have been a loooong 6 yrs - lol. She asked for a "Worm Party". Given that this is probably the last year we'll get away with something non- pink-sparklie-girlie, I took the ball and ran with it! She wanted a pinata and of course being the type of woman who refuses to pay for something I think I could possibly make, I gave it a go. It was quite a job! But I think next time since I have learnt a few things, it would be quicker. I like the idea of putting my own stuff inside it though, given that 6 yr olds still aren't too good with hard boiled sweets, especially if running about playing. I also didn't want unrecognisable ingredients in them like the candy that comes in most store bought ones. We found ONE, yes ONE worm pinata online after a lengthy search (which wasn't available for sale in NZ). This is the finished product - which I think it looks heaps like the original store bought one!
My daughter enjoyed helping me to paste on the crepe paper.

So I thought I'd share how made this, given how tricky I found it to find any info at all on how to do one this shape. Along the way I thought of better and quicker ways to make it and I'll add those ideas in to make it faster for you construct.
Tutorial
Cut out 2 pieces of thickish cardboard in your worm shape (identical shape). Blow up so small balloons and stick some tape on them (rolled over on itself) to stick to the inside of one piece. Put the top worm piece on top of the balloons after sticking some doubled over tape on the tops of the balloons so they stick. Get some strips of newspaper and tape all around as pictured, to secure. 
I actually though afterwards that it would have been better to have used some thick cardboard strips (narrow) and to have stuck them just like the newspaper but INSIDE the worm as it would've made it sturdier for the start of the papier mache part.

Next, carefully cut out a hole on one or both sides where you want the kids to be able to bash through the papier mache and release the sweets. They'll never get through stiff cardboard otherwise. OR do this before you start the first step as above where I put the full worm on first. Use newspaper strips only for this part to secure it all together with tape. Make sure it's sturdy.

Make up some paste out of 1 cup flour and 2 cups warm water (or to your own recipe). Cut up tons of newspaper strips and dip them in the paste. Run your fingers down the strip to get excess paste off or you'll have glue all over the show! Start placing strips flat on the pinata. Do ONE layer at a time and allow to dry for half a day or ideally over night (no one wants mould on their sweets). We did half the pinata at a time, allowed to dry then turned it over and did the other half the next day. We used sauce bottles to keep the worm upright. My advice is to use a plastic tarpaulin over the work surface as the glue just flicks off once dry or washes away in warm water.
 Repeat the layers until you have 4 layers done. I also placed the strips of newspaper in differing directions for more stability. I did a further 3 layers over the part where the sweets were to go (where the cardboard from the structural part was missing).
Use a stanley (craft) knife to cut a trap-door in the pinata where you want the lolly cavity to be. Reach inside and pull out the balloon/s that have deflated and may be hanging about inside near the hole. Place your sweets, etc inside, tape the door closed with thin tape in 2 places, then papier mache over the trap door with a few layers.
Use a hand drill and drill 2 holes in each side in the middle of the worm at the top for hanging some rope or cord through. (See pic of it hanging below). You need to leave a little space and recall where these holes are whilst doing the next part with the crepe paper.
Cut up assorted colours of crepe paper in strips, we used the stuff you get in rolls. Make "tassels" as above.
Use a glue stick (so it doesn't absorb in to the crepe paper and leave a wet look) and place your crepe paper how you want it, poking a hole through it where the holes for the rope or cord for hanging will go. Draw some eyes and a smile on paper and stick on.
Hang cord or rope through it and place over a hook outdoors (we had no trees so used the patio soffit).

 All Done! The kids had a BALL doing this. We had fourteen 6 yr olds and it took them 3 rounds each of 3 hits to split it. We then tipped it up to get any excess lollies out. We'd told them in advance where the cavity was so they weren't hitting all night long. :-D

I will publish the rest of the Worm Party soon.....


Saturday, 22 December 2012

Gingerbread House

My daughter was dizzy with excitement when she saw a picture of a gingerbread house in a book last month - she begged me to make one with her. I'm glad I did, but I don't think I'll be doing another in a hurry - quite a lot of faffing about! I used this template and info HERE as it was quite thorough and had lots of pictorials. I'll include a pic of how to ensure the roof stays on HARD as lots of people have issues with the roof caving in or sliding off, especially once it's decorated. My daughter had so much decorating it once the architectural part was set. She at so many lollies she wanted to puke though - lollies are not common in this house!

Advice is to cook the dough a little longer than suggested so it sets firmer. I had to re-bake mine for 3 mins to make it harder. Soft dough = caving in roof! I used the store bought royal icing mix, I just find it easier than using egg whites etc. We also want it to last for eating on Xmas Day. You can keep them for up to a week if wrapped in glad-wrap (cling film).


The front.
The back (by mistake I cut out a door and window at the back too! So I covered the door with a tree).

The ends of a lid from a printer paper box cut off to slide over the platter. 2 books for height and jars upturned to stop the roof sliding off while the icing set. You'll want to place cling film under the platter PRIOR to sticking the pieces together as it can't be moved whilst setting.

Tuesday, 18 December 2012

Christmas Cake

I saw this cool CAKE and here is my version for this Xmas. I think it's really cute and something a little different.

Monday, 3 December 2012

Christmas card DIY

I try to make at least 2/3 of my Xmas cards. Unfortunately the camera we just bought is TERRIBLE and the pictures of all them are too bad to publish! Anyway, this one isn't too bad so I thought I'd put it up now just in case anyone needs inspiration for their own cards this year. There is STILL time to get crafty!
All this took is a Merry Christmas stamp (and ink, obviously) and I sponged around the edges of the coloured papers with some scrap-booking ink (brown) to make it pop a bit more. The trees are all old paint chip samples, a great way to recycle them! I got a cheap Xmas tree paper punch from Spotlight which will come in handy in years to come. I also had some leftover rhinestones to add some detail.

I sure hope none of this years recipients see these! I hope to add more pics when I can figure out how to clean the lens on the already BAD camera. :D

Feel free to copy my design for gifting but please ask first if you are considering commercial purposes


Saturday, 1 December 2012

Give a Hoot (or something)

I made something else I'd saved on Pinterest! My old school friends had a Xmas afternoon tea today and baked these. I won't show you the mammoth Pinterest Fail I had trying to do something fancy with some star biscuits and flood-filling then using a toothpick to drag another colour over the top. What a disaster they were! Anyway, these turned out nice and it's the first time I've used royal icing.
Original from Three HoneyBees
I made these ornaments for my friends out of felt.
Pattern HERE

Pattern HERE

Monday, 26 November 2012

Novembers crafty goodness

Plain tees are so much cheaper, this one cost me $3. I wanted to make it a bit special. So easy to do, I just used a sml amount of pva glue to place the buttons then sewed them on the next day (the pva just washes away in warm water but do only use a sml amount). Easy peasy.
I also had to patch some favourite jeans (yes I know ripped is in but they were becoming indecent)! I got some of that sticky stuff from Spotlight (for the life of me I can't recall what it's called) and ironed it on to the back of the fabric. Then used pinking shears to cut out the squares, then peeled off the backing of the said sticky stuff and ironed the patches on to the jeans. I wanted to ensure they'd stay on so I zig-zagged around the squares then embellished a bit. I really love them now!
I knitted this tunic for a special wee baby born in Sept and embellished it with the butterfly from Watermellish. This pattern is available on at Pulling at Strings for only US$3 - have a look as her original design is to die for.

And hopefully my cousin doesn't see this hat I have knitted her for Xmas. She's been living in Scotland this year so will be enjoying a snowy winter. The pattern is at Carina Spencer's website and is a FREE download. I'm being brave and actually showing my face!

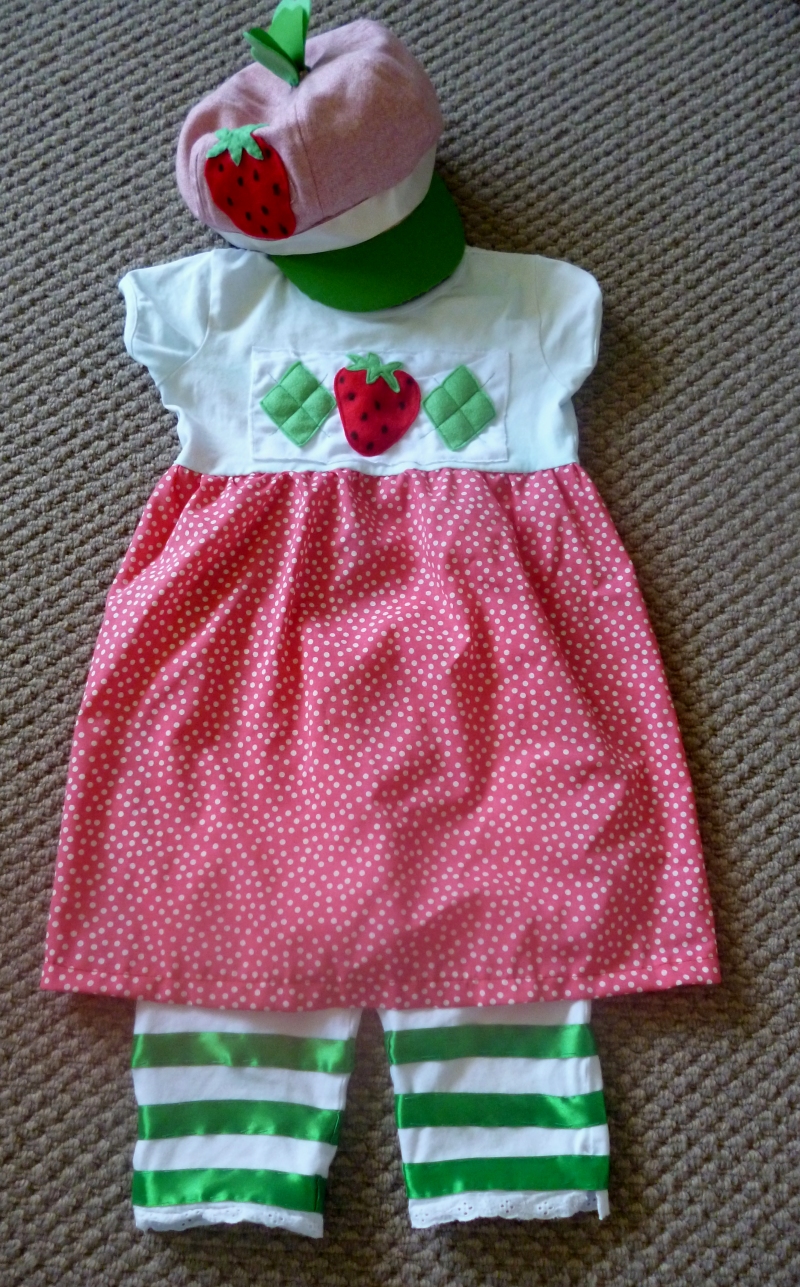
Last but not least - my daughter has book week at school and they have to come dressed up as their favourite book character. She picked the obvious Strawberry Shortcake. Luckily (for her) I'd just managed to leech blue dye from the lower half of a dress of hers over the top white part when 'Nappisanning' it. So cut the bottom off and attached the red spotty fabric, my Mum's friends had given me, to the bottom. I sewed on the strawberry and diamonds on to a white piece of tee shirt material as there was a big star on the front of the white "tee" part of the original dress. She had a hat already that I tacked green fabric on to the visor of and tacked on a strawberry to cover the flower on it originally and some leaves for the top. I had some leftover white ribbon to sew on. All can be easily removed afterwards. Next I got cheap ribbon hanging about and tacked on around the legs of some old white leggings (that also unfortunately got caught in the same Nappisan bucket with the blue dress)! In hindsight if I wanted a quick easy method (and wanted to spend money) I would've used tape to mask the stripes and sprayed green fabric paint on then removed the tape to get stripes. There is a cool tutorial  HERE if you have money to spend and are not inclined to upcycle.

Saturday, 17 November 2012

In memory of my Grandparents

Today we had a memorial service for my grandparents. It's been over a year now since they passed and today was also meant to be an unveiling. Unfortunately something went pear shaped there and we didn't get the headstone in time, so we had a white cross instead - for now.

We decided their ashes should go back to the place we remember them most at. The happy times we shared in this little country town with them, growing up, learning, sharing with them there. It holds a special place in our hearts. All the Christmases we celebrated there, the times I went down on the bus by myself to stay and of course the fabulous times my brother and I had there together. Catching frogs at the pond, playing aeroplanes in boxes on their front porch, swinging under the oak tree, hiding in the hedge, popping to their shop for an ice-block and celebrating special events at the church my Grandad led.

I never got to say goodbye to Nana. Grandad passed away last year on my daughters birthday and we were are away on holiday, but I got to go to the funeral. Nana passed away not long after him but that time I was very sick with the flu and my daughter had pneumonia. That was the hardest thing ever, not being able to visit her when I heard what was going to happen and not being able to attend the funeral and say goodbye. I felt for the past year that I had really missed out, I'd had no closure.

Today was so good for me, personally. I was asked to speak at the service. For the life of me I couldn't think what I would like to say. I spent hours pouring over verses online, from other people, to no avail. Everything seemed too airy-fairy or too heavy. Since my faith has been all over the show the last little while, I found religious readings didn't sit right, but I also didn't want to offend others who still have that belief.

Yesterday, 20 minutes before the school pick up run, I remembered a quote in a book my husband gave me about Tranquillity. For the life of me I can't find it tonight, but it said something about your own courage being the only thing standing in the way of creativity. So I realised I needed to have faith in myself to say something from the heart, instead of trying to make someone else's words fit what I felt. I wrote the following in that 20 minutes, cried a few tears and felt like a HUGE weight had lifted from my shoulders - finally I could say to them what I never got the chance to at the funeral.

So tonight, as I gazed out the window at the beautiful reddish-purple sunset (after a rainy and cold day at the cemetery), I spotted my husband busy planting vegetable seeds. And I thought about the cycle of life. My grandparents sowed the seeds of love, discipline, wonder and compassion in us. They nurtured that. I felt compelled to blog what I said today at the service....


As I was thinking of something to say today, I was reminded of the words of Thornton Wilder. "The greatest tribute to the dead is not grief, but gratitude".

I can't pretend I don't miss them a lot. But whilst they are no longer here in body, I remind myself of how lucky we were to have had such kind, compassionate and thoughtful examples in our lives. 

Both Nana and Grandad have left lasting impressions on so many. I'm thankful for their 'softly-softly' approach to making a difference in the world. Their quiet and humble way of setting an example. I will always be grateful for all the meals Nana cooked for me while I was working nearby where they lived in their latter years, so I had some company at lunchtimes. All the inspirational chats we had together at the table. I'm grateful for the wisdom they passed down to us and the good habits they helped us form.

I'm grateful that when my friends were trying to chase Brad Pitt look-a-likes, that I knew I'd be better off finding a man like my Grandad. I'm grateful they taught us to work hard and to think of others and try to make a difference in the world.  

I'm grateful we were always welcome and always encouraged and supported. 

I'll always be grateful for Nana teaching me some of her crafty skills. I'm sure she wanted to tear her hair out teaching me to crochet (which admittedly I still cannot fathom)! But she always stayed positive. I miss Nana so much when I finish a knitted item and I can't share it with her now. I miss being able to ask Grandad anything and our great debates. I miss Nana's sense of humour.

Nana and Grandad live on in us though. May we think of them often and feel blessed and be reminded of their ways. May we look back at their lives for guidance and inspiration, and make them proud. 

I will be forever grateful that they showed us what love is. 

In the words of Emily Dickinson; "Unable are the Loved to die, for Love is immortality".


Tonight I have a lighter heart and I feel my grandparents close to me - even if that closeness is just what they left behind in all of the lives they touched. I am truly blessed to have had such wonderful grandparents whom helped and guided so many.