Friday, 29 March 2013

Easter Fun

We tried out the Bunny Bun idea that seems to be ALL over the internet right now. I think it's originally used for dumplings or wrapped pineapple buns but we wanted something to go with our boiled eggs. We used our standard bread recipe:

60ml water, (with 2/3 tsp yeast added in), for every 100g high grade flour (known as 60% hydration), a touch of salt, 2 tsp cider vinegar, 2 tsp sugar. Mix everything up and knead dough, then leave to rise in the bowl in a warm place for 2 hrs approx. Knead dough and shape in to the buns and leave to sit for 20 mins approx before baking at 180C for approx 12 mins, (watch them to be sure on cooking time).

Next time we do these we'll be sure to make the ears longer so they look less like cats!

The dough


All done, super yummy and crunchy!

We made some Easter bunny biscuits yesterday and iced them today.
Gingerbread man recipe used.

Sunday, 24 March 2013

Bright skirt for a gorgeous girl

I'm not the most confident with sewing, so this took me some time to make. I had a pattern of course! Simplicity Little Lisette 2064.

It's a little large, my own fault really, lack of experience meant I didn't know at what stages to try it on my daughter. Still, she loves it though. And she was stoked I made her a matching headband.

Simplicity 2064 Little Lisette.


Double sided headband. I made this without a pattern but there are plenty online.

Friday, 22 March 2013

Easter Egg Carrot Gift

I found this idea on the Constantly Stamping website and made my own for my daughter this year. I don't like the focus of Easter being chocolate, so I try and make something that's neat but not with 500 eggs included! I also like the idea of it having another use so it's not just thrown out. I got a scalloped triangle template online and printed it out for the carrot. Then just sewed along the sides. I made the message card on the bow in Word and PSP and printed it out and embellished it. The felt flower was from a cheapy pack I found at Spotlight on sale, but it's super easy to make your own. This is filled with tiny speckled eggs. One day I'd love to try making my own Easter eggs.


Monday, 18 February 2013

Bathing Belles - Art Deco - 2013

While I was absent from knitting group one night, the group unanimously decided that little 'ol me should model an art deco number in the Bathing Belles competition this year. Possibly because I'm so short and it would take less yarn to knit up! Having put 5kg on over Christmas, I was relieved to hear it wouldn't be finished in time. Until last Weds!!!! After eating a batch of cupcakes, thinking I'd have another year up my sleeve, the costume was promptly finished and I was expected to squeeze inside it's tiny parameters. Thankfully the type of yarn (cotton) and the size meant it kind of helped with shape,  I decided if I sucked my tum in I could possibly just pull this gig off - how the heck could I say 'no' after all that effort!

Thankfully most of the knitting girls came down to support this and hold my shaky hand til I had to go on stage. I was so nervous I thought my knees might lock up at one point and they'd have to carry me off like a stiff board. I still can't believe I got roped in to doing this, but I met some lovely people that day.

This was knitted off an original 1920's/ 30's pattern that has been rewritten and published by Jane Waller and Susan Crawford (from the A Stitch In Time book). Handmade by Ruby Atkins.


Saturday, 26 January 2013

Ashley's Wedding

My long-time friend Emily asked me if I could do the flowers for her brother Thomas' wedding. She was paying, so I did the flowers for nothing and she paid for the flowers at the wholesaler. This wedding was to be the NZ edition, they married in Canada recently. I was in touch with the lovely bride, Ashley, via email and we worked out something nice and summery. The lilies had such an amazing scent, they really filled the whole house with perfume.

As usual, there was a bit of stress over the flowers when they turned up. 2/3 of the lilies were fully blown open and the last 1/3 looked they'd never budge open before next Christmas. So we lived in sweaters with the air-con on the lowest setting in the main room, to prevent the lilies dying, the other room had tightly closed lilies beside a heater!! In the end, it all worked out. It usually does, even if some days mean pulling an all-nighter or having to grab flowers from neighbour's gardens (or worse, having to raid the local council gardens - sometimes we even get permission - shhhhh)!

Everyone seemed to love the bouquets.

The bride's bouquet of oriental lilies and green lisianthus - Jan 2013


Handle wrap with a little vintage lace
Bridesmaids bouquet - Jan 2013

Handle wrap

Sunday, 20 January 2013

A Simple Table Arrangement

Wedding flowers can really blow the budget. They are SO expensive. A friend asked me to do her brothers' wedding flowers soon and, we've been discussing a cheap way to decorate the tables. I was a bit worried we wouldn't be able to come up with a suitable option here as we only had $20 left in the budget for 10 or more tables! At $3 stem minimum for most flowers (wholesale), we had to look outside of traditional arrangements. I happened to spot some succulents under a tree while I was out for dinner at my parents. And some flax. So this is what I came up with:
It's about 20cm in diameter and I am thinking a sml candle could be placed in the centre and it could be sprayed with glitter spray, for a bit of evening glitz.

So, here's some quick instructions for anyone who can't figure it out from the pic. The great thing about these is that they will be FREE. All you have to pay for is staples. Unless of course you know no one with succulents and flax (in NZ they're everywhere). And the succulents can be popped straight back in the soil after the event and they will happy re-root themselves in the garden (and the stem you cut off will also grow back again). I've used paper here as an example.

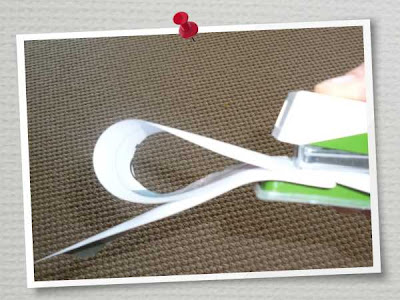
Take your flax, strip it in half (or less if you want it thinner) and fold like this with a tail out the front that will sit on the table under the loop (you'll trim this nicely later).

Staple it to hold the loop flat (you'll need a good stapler)
Cut the excess from the top tail

Trim the tail that will sit flat on the table on an angle like this
So you need to repeat this until you have 6. If you have a grunty stapler that will go through all the flax once you've stacked them together then ignore the next bit. My office stapler wasn't, so I took 2 loops at a time and stapled them together (that would opposite from each other on the arrangement, a bit like a bow would look). Then I grabbed one loop at a time, stapling it to anywhere I could comfortably get the stapler through on the flax of the other loops. Make sure you don't move the loops out of place as you go, ensure the loops are evenly spaced from each other.

Then I just placed a succulent on top, just sitting there (ensure the stem is short enough to achieve a nice flat surface). This will last out of water for days.